Monday, September 30, 2013

Roasted Duck with Hoisan Sauce Dipping

30.06.2010 - Brunei.  I LOVE Roasted Duck and Hoisan sauce.  My first roasted duck making. Looks great and taste good.  Here is my recipe i created.  I hope you like it as i do.

Happy Cooking!!


Ingredients:

Half large Duck
few cups water ( for boiling duck enough to cover whole duck)
2 pcs star anise
4 slices ginger
1 scallion, cut into halves
1 stick cinnamon
5 tbsp Maltose Sugar Syrup
5-6 tbsp white vinegar ( i used Apple cider vinegar, ACV might be very strong in boiling water, ) i recommend to use white vinegar
1 or 1/2 Lemon ( squeezed juice and in whole lemon )
4tbsp dark soya sauce
1 1/2 tablespoons cornstarch, dissolved in 3 tablespoons water

DUCK DIPPING SAUCE
3 tbsp Hoisan Sauce
2 shallots ( finely chopped )
2 garlic ( finely chopped )
Sugar, salt to taste
Dash of sesame oil
3tbsp water
1 tbsp Constarch mixed with 4 tbsp water

Garnish
1 Cucumber, halved, seeds removed and slice finely


Preparation:

*Clean duck. Wipe dry and tie string around neck.

*Hang duck in cool, windy place 4 hours.

*Fill large soup pan with water. Bring to boil. Add ginger, scallion, vinegar, andstar anise, slices ginger, scallion, cinnamon, Maltose Sugar Syrup, Apple Cider vinegar, Lemon ( squeezed o whole lemon juice and in the lemon to the boiling water ), dark soya sauce.  Bring to boil.  Pour in dissolved cornstarch. Stir constantly.

*Place duck in large strainer above larger bowl. Scoop boiling mixture all over duck for about 10 minutes.

*Hang duck again in cool, windy place for 6 hours until thoroughly dry or overnight.

* Place duck breast side up on a greased rack in oven preheated to 350 degrees. Set a pan filled with 2 inches of water in bottom of oven. (This is for drippings) or just over pan with aluminium foil will do but it will be a little smoky. Roast for 30 minutes.

*Turn duck and roast for 30 minutes more. Turn breast side up again. Roast 10 minutes more and the duck is ready.

* Dish up and chop, Plating garnish with slice cucumber and the duck is eaten hot with hoisin sauce and warm rice.  If you want to rolled in Mandarin Crepes eat as Peking Duck, please do not chop the duck, instead you slice the crispy skin just after baked and leave the meat to roll with the crepes and hoisin sauce.


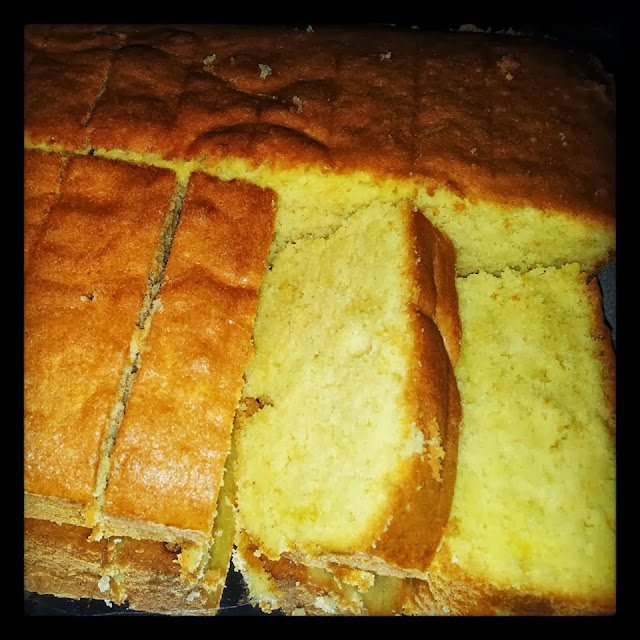


Butter Cake Recipe

03.05.2013 - Batam.  I always love the traditional Butter Cake.  I used to make a traditional butter cake with 9 eggs, a recipe from our cousin who loves baking until today.  I have not been busy searching for a great butter cake recipe since i know i have the best in hand.

One day, i was out of 9 eggs and was thinking to bake myself a butter cake! Nah!! problem comes!! how to make a butter cake without 9eggs in my mind. so i search high and low for a less egg butter cake. and finally after reading and watching so many types of butter cake recipes from so many good bakers, which they use less eggs.  So i give it a try without using so many eggs. Here i come to modify one! my 4 eggs recipe taste just as good as 9 eggs. Save us a lot of eggs!!

Tell you, is not easy to modify the recipe, i have to test my comment sense and baking skill...hehe...Anyway, the cake came out perfectly good.   Im using the same old steps for this recipe.  Anyone can bake this. It is easy.

Note : To make a delicious butter cake is to use a good quality butter, such as i recommend to use

Wood Dunn Dairy Maid Pure Creamery Butter ( if you use this butter,  i guarantee your butter cake can smell a mile away!! this is highly recommended ) , Golden Churn Pure Creamery Butter, Elle & Vire Unsalted Butter, PRESIDENT Butter, LURPAK Butter, Anchor unsalted Butter. 


BUTTER CAKE RECIPE

230g butter, softened
230g self raising flour / cake flour
140g caster sugar
4 eggs seperated
100ml fresh milk
1 tbsp vanilla extract
2 tsp baking powder


METHOD

* Grease pan with butter.  I used rectangle aluminium cake pan instead of loaf pan.  You can use 2 butter loaf pans or a round aluminium pans for this cake.

*Separates 4 eggs yolks and white.  in a bowl egg yolks are gently mix with a fork and put aside

* Beat butter till pale yellow, add in sugar beat till pale and double volumn. Add in egg yolk one at a time into 8-10 times slowly to the butter mixture.  Beat and scrap the side of the bowl, beat & scrap method to finish it off.

* Sift in flour, baking powder and vanilla and mixed well with a hand mixer until almost combined and stop. Do not over mixed it.

* Add milk and mix this finale stage with a spatula.

* A grease free bowl, beat 4 egg whites until soft peak. Mixed in 2 spoonful beaten egg whites with spatula into batter mix well and fold in the batter into the balance egg white bowl. This way the batter very well combined.

* Fold in batter to pan and Bake 180c, 45mins.

*Inserted a skewer / satay stick into the centre comes out clean means cooked. Turn out onto a cooling rack and leave to cool.


My son is busy with his share! hehehe :P


Sunday, September 29, 2013

Japanese Cotton Cheesecake

29.09.2013 - Batam.   I am a Japanese Cotton Cheesecake Lover!  But i never challenge myself to make one. Since last year, I have been watching Japanese Cotton Cheesecake on youtube many times and it looks difficult to me.  I have this thing in my head, anything to do with cheesecake, is not easy!! the water-bath thing and negative comments that i have heard and read, holding back my thoughts of trying one.

However, this year and recently i have been baking quite a lot.  to look back the video of making Japanese Cotton Cheesecake is just like not that difficult any more!! Since i have cream cheese in my fridge, so i thought of trying out just once, see whether is as easy as it look on the video or i just don't have that baking hands to handle cheesecake!.

For many, this is the simplest and easy Japanese Cotton Cheesecake i've got.  Mine, came out well but not perfect as it looks in the video! I find that my cheesecake contain lots of air bubbles.  Maybe i should have tap more longer before baking.  Taste is fantastic! texture so light, airy, fluffy and just melt in your mouth.  Keep cheesecake in the fridge overnight and the next day it taste even better, excellent!

Happy Baking.


INGREDIENTS:-
228g cream cheese (room temp) ( I have used 250g came out perfectly )
200ml milk
60g  unsalted butter
6 eggs separated
140g sugar
60g flour ( 1/2 cup )
20g corn starch ( 2tbsp + 1tsp )


Method :

*A large aluminum round Cheesecake Pan with removable bottom ( im using non stick heart shape pan ).  Prepare pan, spray any types of vegy oil or butter on pan and cover with parchment paper.  Double Aluminium foil to cover bottom  pan to avoid water from goin into the pan.

*Seperate eggs white and yolk, keep aside

* Double boiler, melt butter, cream cheese & milk until all combine, mix well with a ballon whisk, put aside

*In a smaller bowl, mix egg yolk with about 2 tbsp of sugar and beat egg yolk till semi thick with a hand mixer or balloon whisk, until yolk turn lemony color.

*Mixed beaten egg yolk into cheese or cheese into yolk it doesn't matter, and stir with spatula or balloon whisk till combine.  Sift in corn flour and flour into the cheese mixture and mix well.

* Sift cheese batter mixture to remove any lumps. Shift two times for safer side if you want to.

*Pre-heat oven by now at 300f or 148c

*Beat egg whites in a clean and grease free mixing bowl at high speed using an electric mixer or you wanna whisk with your hands.  This takes about 2 to 3 minutes. Reduce the mixer speed to low and add in the sugar one at a time in three lots . When the sugar is well incorporated to egg white, adjust the mixer speed to high, and beat the egg white batter for about 3 ~ 5 minutes, or till soft peaks formed.

* Mixed in 2 half egg white batter into cheese until combine and pour all cheese mixture into the balance bowl of egg white batter.  This way the mixture is well balanced and combined.

*Pour in batter mixture into round pan, Tap the batter-filled pan on the counter before baking to remove air bubbles.

*Bake pre-heated 300f or 148c for 1 hour 20 mins.  BY baking the cake in a water-bath, it lower down the temperature to prevent shrinking significantly.

*Water-bath baking.  After 30mins if you notice the water dry up, quickly open and close the oven when refill water. but if  possible do not open the oven to interrupt the temperature ( this is a very sensitive cake ). Right temperature is very important.  You may cover cake with aluminium foil carefully before start baking. This is to prevent from browning to quickly.  20 mins before done, remove aluminium foil to let it brown the rest.

* Cake is done is to stick a toothpick into the center of the cake and pull it out. If the toothpick comes back clean, the cake is done.

Leave the oven door open about 2cm with a wooden spatula for 30-45 mins without water bath. Take the cake out and completely cool it down.

* To removed cake from pan, run a knife gently around the edges. ( If you use parchment paper shouldn't be any problem at this stage, you won't need a knife to remove the cake from pan).   Remember always bake with a parchment paper, so as you could remove cake easily and cake looks more presentable.  If you don't use parchment paper you will end up removing your cake like mine with a knife and won't look so nice with all that broken pcs from the side as you can see my pic.

* After cake all cool down, transfer to a cake stand or board or plate as you like. This cake is originally eat it plain without frosting.  but if you would like to put frosting, you may do so, layer cake into 2 layers and apply cream cheese frosting and on top with a thin layer of cream cheese sprinkle with shredded cheese.

*A large aluminum round Cheesecake Pan with removable bottom, Im using non stick heart shape pan with removable bottom.  Prepare pan, spray any types of vegy oil or soft butter on pan and cover with parchment paper.  Double Aluminium foil to cover buttom  pan to avoid water from into the pan.

*Separate eggs white and yolk, keep aside.

* Double boiler, melt butter, cream cheese & milk until all combine, mix well with a balloon whisk, put aside


*In a bowl, mix egg yolk with about 2 tbsp of sugar and beat egg yolk till semi thick with a hand mixer or balloon whisk, until yolk turn lemony color. 


*Mixed beaten egg yolks into cheese or cheese into yolks it doesn't matter, and stir with spatula or balloon whisk till combine.  Sift in corn flour and flour into the cheese mixture and mix well.  


* Sift cheese batter mixture to remove any lumps. Sift two times for safer side if you want to. ( please use a bigger flour sifter to do this step, mine is too small and thats what i have in my kitchen.  pls see below picture for a good sift with this equipment )


*By this time, you should be pre-heating your oven at 300F

*Beat egg white in a clean and grease free mixing bowl at high speed using an electric mixer or you wanna whisk with your hands.  This takes about 2 to 3 minutes. Reduce the mixer speed to low and add in the sugar one at a time in three lots . When the sugar is well incorporated to egg white, adjust the mixer speed to high, and beat the egg white batter for about 3 ~ 5 minutes, or till soft peaks formed.  


* Mixed in 2 scoop full egg white with spatula into cheese batter until combine.  

*After combine, pour in the cheese mixture into the balance egg white batter bowl.  This way the mixture is well balanced and combined.


*Pour in batter mixture into pan, tap the batter-filled pan on the counter before baking to release air bubbles.  ( I run out of parchment paper, so do not follow me. is advisable to use parchment paper for this cake, this cake will rise ) 

*Bake pre-heated 300F for 1 hour 20 mins,


*By baking the cake in a water-bath, it lower down the temperature to prevent shrinking significantly. 


*Water-bath baking. ( this is a very sensitive cake ). Right temperature is very important.  You may want to cover the cake with aluminium foil carefully before baking. This is to prevent from browning to quickly.  20 mins before done, remove aluminium foil to let it brown the rest.


* To know when your cake is done, insert a long stick ( satay stick ) into the center of the cake and pull it out. If the stick comes out clean, the cake is done.  Leave the oven door open with a wooden spatula about 2cm for 30 mins without water bath. Take the cake out and completely cool it down.


* To removed cake from pan, run a knife gently around the edges. ( If you use parchment paper shouldn't be any problem at this stage, you won't need a knife to remove the cake from pan).   Remember always bake with a parchment paper, so as you could remove cake easily and cake looks more presentable.  If you don't use parchment paper you will end up removing your cake like mine with a knife and won't look so nice with all that broken pcs from the side as you can see my pic. 

* After cake all cool down, transfer to a cake stand or board or plate as you like.
This cake is originally eat it plain without frosting.  but if you would like to put frosting, 
you may do so, layer cake into 2 layers and apply cream cheese frosting and 
on top with a thin layer of cream cheese sprinkle with shredded cheese. 


So airy light.


Tuesday, September 24, 2013

Crispy Fried Chicken

2009 Vanuatu.  Port Vila, I have finally found and created my very owned fried chicken ingredients! It all started when i was missing deep fried chicken at fast food restaurant like KFC or Ayamku whatever deepfried chicken that is i had.

Living in Vanuatu has no fast food chain or have i ever seen selling fried chicken.   so the only way is to make my own.  i had tried a few recipes, do experiment,  I attempt failed and only the 3rd attempt was a success.

My crispy fried chicken is not only crispy in the outside but juicy inside out.  The aroma smell when deepfrying just took your breath away!!  this can be smell far away according to my husband when he on his way home! he could smell my chicken from the kitchen.

Im so please with this recipe.  so delicious!  Until today, i am still using this recipe for my deepfried chicken to serve my son, guests and they just love it!


Marinate Ingredients and chicken parts of your choice:-
salt,
sugar,
pepper,
meggi chicken granules,
1 egg, lemon juice,
Dry herb- Tarragon,
light soya sauce,
garlic powder / chop garlic. ( used chop garlic )

* poke chicken meat with fork and marinate for 1/2 hours or longer.


Mixing Flour Ingredients:-
All purpose flour
Salt
Meggi chicken granules
White Pepper
Very mild Chili Powder product of franch, or Paprika powder ( just a few dash )
Black Pepper

Method :

Mixed marinated chicken with flour and deepfried with medium heat fire.

When turn golden brown, dish up and served with a special dipping sauce made of chopped thai chili, dash of salt and calamansi juice. Simply delicious!!


Yam Puff / Wu Kok

2009 Vanuatu, south pacific.  Port Villa Vegetable Market has plenty of beautiful yam available everyday.  and so i thought of making something with yam.  I saw this Yam Puff recipe quite interesting. so i gave it a try.

Result came out not bad at all.  However, my yam puff didn't look like the restaurant Yam puff so puffy, Still need a lot of practise or have to check other recipes to get my puff more puffy in the outside, something might be missing or my technic is wrong either way.   However, for the taste absolutely delicious!


Deepfried Yam Puff / Wu KoK
Ingredietns :-

600gm Yam ( do not wash after peel ) steamed and mashed.
75g wheat starch ( tang mein flour ) Mixed with 75ml boiling water and stir till mixed.  Texture like glue, so control the hot water as you go along
70g shortening
1tbsp sugar
1/4 tsp 5 spice powder
1tsp sesame oil
1/4 tsp pepper

Fillings :-
chicken, prawn, mushroom, green peas, chopped garlic, onion and cooking oil
Seasoning :-
1/2tbsp chicken granules
1/2tbsp oyster sauce
1/2tsp soya sauce
1/2tsp sesame oil
1/2tbsp corn starch
1/2tsp sugar
pepper to taste
4tbsp water
Oil for deep-frying


Saturday, September 21, 2013

Grilled Chicken Char Siew

Char Siu / Char Shao is a popular way to flavour and prepare BBQ pork in Cantonese cuisine.  It is classified as a type of siu mei, cantonese roasted meat.  Char Siu literally means "fork burn/roast" after the traditional cooking method for this dish.  Long strips of seasoned boneless pork are skewered with long forks and placed in a coverred oven or over a fire.  

In olden days, wild boar and other available meats were used to make char siu.  However, In modern times, the meat is typically a shoulder cut of domestic pork and now widely used chicken breast.  seasoned with a mixture of honey, five-spice powder,hóngfǔrǔ (red fermented bean curd), lao chou (dark soy sauce, 老抽), hoisin sauce (海鮮醬), red food colouring (not a traditional ingredient but very common in today's preparations and is optional) and sherry or rice wine (optional). These seasonings turn the exterior layer of the meat dark red, similar to the "smoke ring" of American barbecues. Today there are plenty of ready made char siu sauce available too.


Char siu is typically consumed with starch, whether inside a bun (cha siu baau, 叉燒包), with noodles (cha siu mein, 叉燒麵), or with rice (cha siu fan, 叉燒飯) in fast food establishments, or served alone as a centerpiece or main dish in traditional family dining establishments. If it is purchased outside of a restaurant, it is usually taken home and used as one ingredient in various complex entrees consumed at family meals.

Basic recipe for Chicken Char Siu
Ingredients:-
1/2 cup Hoisin Sauce
1/4 cup Honey
1/4 cup light Soya Sauce
2 tbsp Toasted Sesame Oil
2 tbsp Tabasco
2 tbsp Ginger Powder / Juice
2 tbsp Onion Powder
2 tbsp Red Food Coloring
1 tbsp Garlic Powder
1 tbsp Five Spice Powder

For Glaze - 1/4 cup Honey / Ready made Char Siu Sauce ( Lee Kam Kee Brand)

Method:-

Marinate meat overnight or 3 hours.
Pre-heat Oven 250c, grilled for 45mins or longer depending on the thickness of your meat.
After 15 mins coat the meat with glaze and grill for further until done.  If u wish to have more burn at the size of the meat, coat more thick glaze / honey on the meat.

Do not throw the left over glaze, chop some fine shallots & garlic, heat the sauce pan, in shallot & garlic and  bring the left over glaze to a boil and served on grilled char siu.

Ready to grill


My son can't wait to dig in 

 Char siu sauce, You may create another sauce with hoisan sauce & char siu sauce from LEE KUM KEE.  Mix both sauce together add sugar and soya to taste and its done or just simply add water and cornstarch to thicken. 

Served hot char siu with warm rice! YUMMY


Pizza Crust & Toppings Recipe

2011 was the year i started making my own very first Pizza.  Who doesn't love pizza? and imaging having the toppings you desire and pay less.  Yes. Make your own is the best way!

I love pan pizza. Im happy that i could make my own pizza at home.  i can add any toppings i want.  I love black olives, so you can see my pizzas have plenty of olives on.  Below are the ingredients for a very basic pizza dough.

I am very familiar in pizza making with this recipe, i can assure your crust will be perfect!

Below are some of my pizza pictures making in different occasions for mom, sisters and occasionally for myself . I used so many kind of toppings, one that i like the most is with BBQ sauce. i think taste the best.


PIZZA DOUGH/ CRUST
1 1/2 cups warm water
1 package (2 1/4 teaspoons) of active dry yeast (check the expiration date on the package)
3 1/2 cups bread flour (can use all-purpose but bread flour will give you a crisper crust)
2 Tbsp olive oil
2 teaspoons salt
1 teaspoon sugar

TOPPINGS OF YOUR DESIRE / SOME TOPPINGS IDEA:-
Tomato sauce (purée) IS A MUST for base 
BBQ Sauce
Mozzarella or Parmesan cheese, shredded
Feta cheese
Mushrooms, thinly sliced
Bell peppers, stems and seeds removed, thinly sliced
Italian sausage, cooked ahead
Chopped fresh basil
Pesto
Pepperoni, thinly sliced
Onions, thinly sliced
Sliced ham
Pineapple, thinly sliced

METHOD :-
Combine the water, yeast and sugar in a small bowl. Set aside for 5 minutes or until foamy. Combine the flour and salt in a large bowl and make a well in the centre. Add the yeast mixture and oil. Use a round-bladed knife in a cutting motion to mix until the mixture is combined. Use your hands to bring the dough together in the bowl.

Brush a bowl lightly with oil. Turn the dough onto a lightly floured surface and knead for 10 minutes or until smooth and elastic. Place in the prepared bowl and turn to coat in oil. Cover with plastic wrap and set aside in a warm, draught-free place to rise for 30 minutes or until dough doubles in size.

Working one ball of dough at a time, take one ball of dough and flatten it with your hands on a slightly floured work surface. Starting at the center and working outwards, use your fingertips to press the dough to 1/2-inch thick. Turn and stretch the dough until it will not stretch further. Let the dough relax 5 minutes and then continue to stretch it until it reaches the desired diameter - 10 to 12 inches. Use your palm to flatten the edge of the dough where it is thicker. You can pinch the very edges if you want to form a lip.

Brush the top of the dough with olive oil (to prevent it from getting soggy from the toppings). Use your finger tips to press down and make dents along the surface of the dough to prevent bubbling. Let rest another 5 minutes.

Transfer one prepared flattened dough to the pizza peel. If the dough has lost its shape in the transfer, lightly shape it to the desired dimensions.

Cook pizza in oven 500F ( 260c ), about 20-30mins.

Prepare your desired toppings. Note that you are not going to want to load up each pizza with a lot of toppings as the crust will end up not crisp that way. About a third a cup each of tomato sauce and cheese would be sufficient for one pizza. .

Spoon on the tomato sauce, sprinkle with cheese, and place your desired toppings on the pizza.

Bake pizza one at a time until the crust is browned and the cheese is golden, about 15 minutes. If you want, toward the end of the cooking time 5-10mins you can sprinkle on a little more cheese.


with BBQ sauce

Poached Duck with Mandarin Orange Peel Soup & Vinegar Ginger Dipping Sauce

12.11.2012 - Batam.  Poached whole duck with Mandarin Orange Peel Soup & Vinegar Ginger Dipping sauce is my Mom's classic signature dish! 

Our family just love this dish, the Mandarin Peel Soup is so refreshing and so as the Vinegar Ginger dipping sauce, with that sour, spicy from ginger and sweetness from sugar taste just a great combination with the beautiful poached duck.  I remember we ate this only occasionally on special event. 


I know this pic of poached whole duck doesn't really looks appealing, 

but the taste just magic!!  

Poached Duck and Soup
clean duck put aside.


MANDARIN ORANGE PEEL SOUP & POACHED DUCK

Fill a pot of water to boil, while boiling,


put in 3 or 4 red dates,


a thumb size of preserved salted veg ( tai tio choi ) for soup.


add in a few dried mushroom ( already soaked and cleaned ) if u like dried mushroom you can add more as you like.,


add in 1 whole cleaned dried mandarin orange peels. ( dried mandarin orange skin already been dried under the sun for a month or so until completely dried and make sure your orange peel no mould on it. ) If you wish a stronger orange smell and taste, you may add more orange peels. i love orange peels, i add about 1 and 1/2 peels in the soup! smells heaven!!!


Now cook the soup til boiling stage, add in whole duck. Let it cook for 45mins and gradually slow down the fire, so depending on your size of the duck, slowly cook until duck is cooked through.
When duck is cooked, dish up and put aside. chop the whole duck when its totally cool or warm and plating time.

Back to the soup, bring the soup to a boil, add in taste salt, chicken granules and little bit oyster sauce to taste.


VINEGAR GINGER DIPPING SAUCE RECIPE
pile and grated fresh ginger about half a small rice bowl and add vinegar about the same level of the amount of ginger and add sugar until you get that sweetness and the spiciness of the ginger and sourness of the vinegar consistency. these 3 sauce should taste exactly happening with the duck at the same time when you eat. This is it for the sauce. Very delicious with the duck. Unfortunately i forgotten to take picture of the Vinegar Ginger Dipping Sauce.
Happy cooking


Sundanese Ayam Bakar

17.11.2012 - Batam. Was great to have my MIL here in Batam. A short visit though. When we were in Jakarta she always cook us Sundanese Ayam Bakar and she mastered this dish. My MIL is Sundanese Indonesian. Now since she's here. It's my turn to cook her her Sundanese Ayam bakar.. 

We all love Sundanese Ayam Bakar. She gave me her recipe and i saw how she cooked. so is time to show her my version of Sundanese Ayam Bakar. Its really a pleasure cooking for her and it is good to have her to see how i cook to correct me.

There are many types of Ayam Bakar in Indonesia. Sundanese Ayam Bakar is very easy to cook. first step you need to stew the chicken and when its cooked, then grill it with a Grilling Pan to finish it up. In this process, BBQ grill with charcoal can be used, i don't advise to cook this in the oven. it will turn out differently, as this is a traditional style of dish.  so to use open fire is the best way.
Ayam bakar pan can get easy around indonesia. This is a very well known dish in this country, they made Ayam Bakar Pan specified for Ayam Bakar cooking. My mother in law type was different from mine, i bought a different type to try which is better. its about the same result. If u get find one, just need cook on top of the bbq grilled done.


Sundanese Ayam Bakar - My M-In Law Recipe.
ingredients 4 chicken thigh ( if u use less chcken, reduce the ingredients ) fresh ginger ( about thumb size ) or ginger powder lengkuas ( double thumb size ) or lengkuas powder shallots 2pcs ( blend or finely chopped ) garlic 15pcs ( blend or finely chopped ) asam keping 1pc cenke 5 pcs kayu manis 1or 2 pcs short star anise 1pc serai 1pc daun salam 3 or 4 pcs salt chicken granules Indonesia kicap manis cooking margerin

METHOD 1) clean the chicken put in a big bowl. Add in blended the garlic and shallots, ginger, lengkuas, asam keping, cengke, kayu manis, star anise, serai and daun salam, add salt & chicken granules all in the bowl and mix well with hand for 5 mins. Keep it marinate for 1 hour or 2.
2) Heat wok or pan, put little bit vegy oil add in marinated chicken. Let it brown from one side and turn to another. until both side are equally brown, make sure chicken skin not to stick on the wok or pan, and add about 2 cups of water and cover with lid, let it cook slowly.
3) about 5 mins turn chicken and cook again few mins until water almost try. andd in kicap manis about 3 tbsp. add little water so as it wont burn continue cooking till the chicken all in black color and water almost dry up. off fire.
4) transfer chicken to a bowl. and with a brush / spoon, in the butter/margerine on the chicken equally for bbq it. Let the chicken sit for 10 mins. and ready to be bbq
5) and the last step is bbq/ open fire grill is the best way to cook this recipe. since the chicken already cooked, the grill process just to make the chicken more aromatic and with nice burn from the grill/bbq. so once it is brown nicely, dish up and served.

the best way to eat this with hot rice, Homemade Sambal, kemangi and perhaps some raw petai to boost up the dish! :P

Happy cooking.


This sambal pound with stone mortar ( refer to sambal recipe )


Quick & Easy Bibimbap in a Bowl ( Korean Mix Rice )

This for sure is everyone's favourite dish! Bibimbap simply has everything you need in one bowl, eating 'em is easy too by mixing ...