Wednesday, May 31, 2017

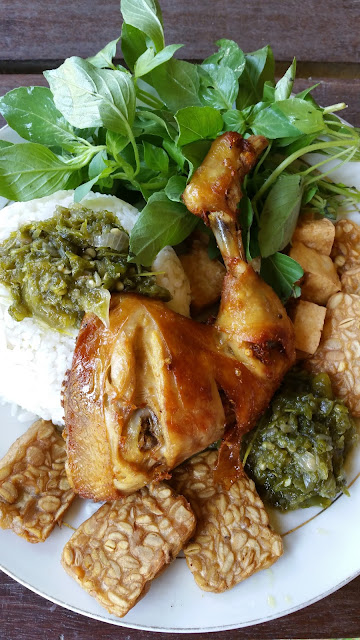
Ayam Goreng Indonesia ( Fried Chicken Indonesia Style )

This Ayam Goreng recipe is so simple yet so delicious!! Not only that, this recipe can be transformed into many kind of dishes, like the famous Ayam Penyet ( fried smashed chicken ), Ayam Goreng Sambal Hijau, Ayam Goreng Sambal, Ayam Goreng Kremes or etc. anything condiments you can think of to go with it.


AYAM GORENG INDONESIA
INGREDIENTS:-

3 large Chicken Thighs
3-4 daun salam
2 large lemongrass
3tbsp corriander seeds / ketumber
500ml water

A- INGREDIENTS - FOOD PROCESSOR
3-4 large shallots
3 garlic cloves
1 thumb size tumeric
1 thumb size ginger

SEASONING
Salt to taste
half Gula merah

METHODS:-

* Blend ingredients A set aside.
* heat oil in wok, add ingredients A sauteed til aroma, add in daun salam, lemongrass and corriander seeds mix well, add chicken and seasoning to combine, add water, close with wok lid let it simmer.
* Cook chicken about 20 minutes until chicken no trace of chicken blood, dish up set aside.
* Heat cooking oil, deep-fried chicken in medium fire until golden brown.
* Dish up and served hot with warm steamed rice.

I eat my yummy fried chicken with Padang Sambal Hijau, fried tempe, taufu, daun kemangi and of cos warm steamed rice.....so so yummy!! 

Padang Sambal Hijau

Deliciousness is Padang Sambal Hijau!! My condiment that i cannot go without, it is not too spicy.


PADANG SAMBAL HIJAU
INGREDIENTS:
20pcs / Handful of cabe hijau keriting
5 fire green chili ( if you prefer little more spicy can add more fire chili )
5-6 large shallots
3 garlic cloves
3 green tomato ( small-medium )
3 kaffir lime leaves

SEASONING
salt and sugar to taste

* Heat wok, boil all the ingredients until soft in hot water except for lime leaves. Dish up.
* Use an Indonesia mortar or pestle to ground all ingredients into semi fine sambal set aside..
* Heat oil, cook ground sambal in kaffir lime leave, add seasoning and cook for few minutes until oil surface and appear like pesto. Dish up.
* Sambal can store in air-tight container keep in fridge up to 3 months.


Tuesday, May 30, 2017

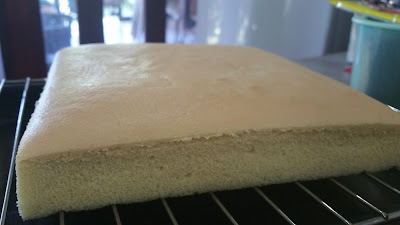
Old School Sliced Cake with Buttercream

15.04.2017 - Who remember these beautiful buttery cream slice cakes? I do, i remember mom love to bring me to her friend kopitiam drink lemon tea with 2 slices of these beautiful slice sponge cake with buttercream cake, i love it so much!! I was just in my primary school those days.  

Those days, these cakes are so simple, delicious and no complication...lol*  I always pick the rectangle 2 layers slice cake with piping gel and little flowers on top, the other of my favourite are in round shape, sometimes i love to pick with coated peanuts top with piping gel or round cake coated with coconut and top with piping gel, simply yummy!

Every time i crave for it, i started searching recipes, looking at old school cakes pictures....ahaah....just couldn't resist those temptation. What keeps me being lazy to make are basically i imagine too much work with this tiny cakes, need to bake a cake, make buttercream and piping gel, this and that.....but finally i decided to make them anyway.

This recipe from Lucindafamilykitchen blog. I choose to make all vanilla flavour this time, i hope when i am not lazy and crave for it next time, i will try coffee and strawberry sponge cake with vanilla!!  

I still find my sliced cakes very uneven, messy and not so beautiful.  Anyway, i am happy with the outcome at least finally i got to taste it my very own old school sliced cakes!!! Horey!!..bite to my childhood memories. I will make more beautiful next time. 


BASIC SPONGE CAKE 
4 egg yolks
75ml corn oil
100ml water
150g self raising flour ( i dont have SRF, so i use cake flour + 1tsp BP )
4 egg whites
100g caster sugar ( i reduce to 80g )
* for coffee cake, add 1sp coffee paste

METHOD
* Line 20x20 / 8" square pan base only, side no needed to grease, set aside
* Beat egg white until peak with sugar, side aside.
* Beat egg yolks until double volume in between add in paste beat until combine.
* Add oil slowly follow by water with a mixer, fold in flour slowly with mixer until all combine.
* Add in meringue into 3 batches.
* Pour into baking pan.
* Preheated 180c, Bake for 30 minutes.
* Invert cake into wire rack to cool.
* When cake is cool, halve the cake, slice sponge cake into 2 layers and fill with butter cream.  Top with your own decoration desire.
* Delicious to consume in room temperature.

FROSTING 
SWISS MERINGUE BUTTERCREAM ( SMBC) RECIPE
150g Cold butter
2egg whites
60g sugar

* Double boil egg whites and sugar, whisk till sugar melt, removed egg whites, beat on high speed until peak and add cold butter, keep beating until it has become smooth cream.


Sunday, May 28, 2017

Banana Sponge Cake

This is a present for my friend birthday! :P She loves my Banana Cake.

This is such a lovely cake that i haven't got the chance to share for years, i have been baking this repeatedly like 5 times last year. I found this recipe from happy home baking .

When comes to baking involve with fruits,  i prefer to use brown sugar which the whole cake won't overly sweet when blend in the fruits.  For this recipe, the original recipe called for 150g of sugar, happy home baking had reduce to 100g with her recipe, however i still find it sweet, so i use brown sugar instead of caster sugar.  Did little extra banana decoration on top. :)


BANANA SPONGE CAKE
( For this time i used 6" round pan, the rest of my baking with this recipe i used 8" pan )

(A)
3 large eggs
100g brown sugar
250-300g Banana ( about 3 large medium ripped banana )
* mix everything in a mixing bowl.

(B) sift
150g cake flour
1/2tsp baking powder
1/4tsp baking soda
* sift 3 ingredients and set aside.

(C)
80ml oil
20g milk
1tsp vanila
* mix everything in a bowl, set aside.

DECORATION
Keep 1 or 2 bananas for decoration

METHOD:-
* 6" or 8" round pan. Lightly grease side and bottom, line grease paper bottom, dust flour side pan.
* In a mixing bowl. Mix ingredient (A) beat with a electrical mixer until ribbon stage, takes about 7-8 minutes.
* fold ingredients (B) in 3 separate addition with a spatula gently till all mix well, do not over mix.
* take 1/3 batter, mix in to ingredient (C) mix well with a balloon whisk and pour back into the rest of the batter and mix well until combine with a spatula.
* Pour batter into baking pan slowly, slice fresh banana thinly and decoration with your own desire.
* Preheat oven 170c, for 1 hour and 30 minutes.
* When it is done, remove cake from oven, invert cake on a wire rack to cool.

Happy Baking!!


6 Layers Dark Chocolate Cake

27.04.2017  This is a special request from my little cutie pie a chocolate cake with white cream* he means whipped cream lol* and so i come out this idea of making him a big 6 layers chocolate cake with whipped cream filling inside out.

Im using my regular chocolate cake double the recipe.  This chocolate cake so far is the best not too sweet for me.  Before i decided to use this recipe again, i have been searching for some chocolate cake recipes however still end up using the same one that never fail me. :) The best part of this cake is Not Overly Sweet! Love it!


6 LAYERS CHOCOLATE CAKE RECIPE
( 2 x 6" round cake pan )

8 egg yolks large
50g caster sugar
100ml vegetable oil
140ml water
2tsp vanilla extract
170g cake flour
50g dark cocoa powder
3tsp baking powder
dash of baking soda

8 egg whites large
110g caster sugar
1/4 tsp x 2 Cream of Tartar

WHIPPED CREAM 
1 1/2 cup non dairy topping, whipping cream ( whip til stiff set aside )

CHOCOLATE GANACHE 
50g dark chocolate, coarsely chopped
50g whipping cream
* melt and let it set in room temperature before use

METHOD:-
- Line base of a 6" round pan with parchment paper. Do not line or grease the sides.
- Sieve cake flour, cocoa powder, baking powder and dash of baking soda. Set aside.
- Beat egg whites till foamy add in cream of tartar, until stiff peak set in the fridge for later use.
- Pre-heated oven at 170c
- Beat egg yolks until double and thicken.  Add oil, water and vanilla gradually just combined. Add in  flour with hand whisk till well combined. Do not over mix. Set aside.
- Mix meringue into batter.
- Pour batter slowly into the prepared round pan to get rid of air bubbles or just in case you are to fast pouring in the batter, you may tap the pan lightly after pouring batter to the pan.
- Bake in pre-heated oven at 170c for 45 mins, center oven.
- After cooked, insert a toothpick to the cake, when come out clean, its done.
- Invert the pan immediately and let cool completely before unmould.
- To release the cake from the pan, run a thin-bladed knife or a off-set spatula around the inside of the pan.
- Slice horizontally into 6 layers. Frost cake whipped cream, top with chocolate ganache.
- Decorate as desired. Keep chilled in fridge.


Stir-fried Papaya Flower with Dry Shrimps

This is yummy stuff!! I love eating papaya flowers, i remember eating this when i was a kid, it was bitter to the top and i hate it so much.  Mom love mix this with cangkuk / sayur manis.  This time i use bok choy basically i do not have sayur manis, both taste more or less the same. love it.  I do not remember how mom cook, but my way, i turn it into a delicious delicacy! it isn't as bitter as it was before anymore! yum

Look at the colors, so beautiful and delicious!

Ingredients:-
2 Pkts Papaya Flowers

Chopped finely with Food Processor-
3 garlic, finely chop or pound
3 shallots, finely chop or pound
10 chili keriting
4tbsp dried shrimps ( soak in water until soft ) 

Seasoning:-
2tbsp Chicken Granules
Sugar and Salt to taste
4tbsp water

Method:-
* Pick and clean and set aside. 
* Heat wok, add in 500ml water and add 1tbsp salt.
* When water start boiling, add in papaya flower let it cook for 5-7 minutes.  This is to reduce the bitterness of the flowers.  Dish up, discard water, set cooked flower aside.
* Heat wok, sauteed chopped ingredients until aromatic, season with salt. 
* Add in cook papay flower mixed well and add the rest of the seasoning, stir, mix well till combine.
* Add water stir fry for a little while and dish up! serve hot with rice.

Simple and Easy, Happy Cooking!


Saturday, May 27, 2017

Zongzi Chong's Family Recipe

Growing up never i remember my parent ever make zongzi ourself.  15 years ago, my sister learned zongzi making from one of our cousin and since then she is the only expert in the house.  Unfortunately we were no longer living together in the same country, so i can only imagine how tasty and delicious those zong were those days.  I remember bought some last year but still prefer to eat my family ones.  She did teach me how to make zongzi many years ago, but i wasnt really concentrate and remember the steps of wrapping, wrapping is the most crucial part that discouraging me to start making my own.

well well....this year, i tell myself i should get started or will end up buying the same zongzi again from outside...haha... conclusion i decided to make them, and so i call my sister in malaysia get the recipes and for wrapping wise, i do alot of google searching and video watching here and there.  In Sabah, there is one zongzi i love the most is with black eye peas, i can just eat black eye peas with nothing else.  So basically i make this zongzi fills with lots of black eye peas lol* i do not know is this categorize as chinese Hakka zongzi or chinese sabahan hakka way, because there are variety of zongzi in chinese tradition. As long as i can remember, black eye peas filling is the only beans with meat zongzi that i've ever eaten during those days.

Surprisingly at least my wraps and zongzi look pleasantly ok... and according to my sister was already consider not bad for the 1st time....yeah!! its a success! Mission accomplished


ZONGZI CHONG'S RECIPE 
Prep Time: 24 hours
Cook Time: 4 hours
Yield: 26 zongzi ( big size )

INGREDIENTS:-
60 dried bamboo leaves (2 to 3 leaves per zongzi, store bought dried bamboo leaves )
1 1/2kg glutinous rice
3pcs chicken breast boneless 
15pcs salted duck egg yolks ( i half the salted eggs )
30pcs dried shitake mushroom
30pcs chestnuts
3 cups black eye peas

SOAK OVERNIGHT:-
bamboo leaves  
glutinous rice
shitake mushroo
chestnuts
black eye peas
* cut chicken into cubes and marinate with oyster sauce leave overnight


INGREDIENTS A
SEASONING FOR GLUTINOUS RICE 
3 shallots & few garlic ( finely chopped )
few tbsp cooking oil ( to sauteed chopped garlic and shallots )
1tbsp five spice powder 
4tbsp dark soya sauce 
heavy seasoning of salt

INGREDIENTS B
SEASONING FOR  BLACK EYE PEAS, MUSHROOM, CHICKEN, CHESTNUT ) 
few tbsp cooking oil ( to sauteed chopped garlic and shallots )
2 shallots and few garlic finely chopped
5 tbsp dark soya sauce
2 tbsp chicken granulous 
heavy seasoning of salt
4 tbsp oyster sauce
1tbsp light soya sauce
sugar to taste

METHOD:-
Night before sleep 
* Soak the bamboo leaves overnight. The next day, wash and rinse each leaf front and back, keeping them in a large bowl or tub of water until wrapping time so they don’t dry out.  Soak glutinous rice, black eye peas, mushroom, chesnuts each in separate bowl overnight. The next day, drain completely. Marinate chicken with oyster sauce and leave overnight. 

Next day
* Cook ingredients A set aside, and with a clean wok.
* Cook ingredients B set aside to cool. Dish out chesnuts and mushroom, put in a separates bowl. Black eye peas and chicken mix together in one bowl. 
* Cut the egg yolks in half. Can use 1 whole yolk if you have enough for each zongzi, Set aside in separate bowls.
* All set to wrap.
* ( i will skip the wrapping instruction as you can find many teaching steps or your own wrapping style )
* Fill zongzi in a pot avoiding large gaps, put as close as possible.  Use a soup bowl to fill water and add salt to every bowl of water on refilling into zongzi.  Fill water to cover all zongai. 
* Place pot on stove over medium high heat. Once the water boils, turn heat to medium and let it cook for at least 4 hours. 
* Cooking with a electrical Pressure Cooker will only take 45-50 minutes fully cook through.  
* Please check and keep en eye on the cooking process, adding water with salt into pot when water reduce, and make sure all zongzi is equally submerged in the water. 
* After 4 hours cooking, dish up and discard water. 
* serve warm.  Extra zongzi can freeze up to 6 months. 

Enjoy!

Glutinous rice, chestnut, black eye peas and bamboo leaves soak over night.


 After soak for more than 12 hours, chesnut mushroom, 
beans all looking clean and have expand double in size..

 Cook chestnut, mushroom, beans and chicken season well. After dish up, separates mushroom and chestnut in a separate bowl for easy wrapping.  
The reason we cooked and season all the filling including mushroom and chestnut 
so it is all equally tasty.

 Glutinous rice seasoned 


Ta-Da!! my 1st zongzi  done :P


Quick & Easy Bibimbap in a Bowl ( Korean Mix Rice )

This for sure is everyone's favourite dish! Bibimbap simply has everything you need in one bowl, eating 'em is easy too by mixing ...